Part of: Online IPA Installer
UDID, in brief
A UDID is the 25 or 40 character identifier that belongs to one physical iPhone, iPad or iPod touch. Ad Hoc and development builds carry a list of UDIDs, and iOS refuses to install on a device missing from it.
How to find your UDID in three steps
- Open this page in Safari on the iPhone or iPad you want to identify. Another app's built-in browser can swallow the profile prompt.
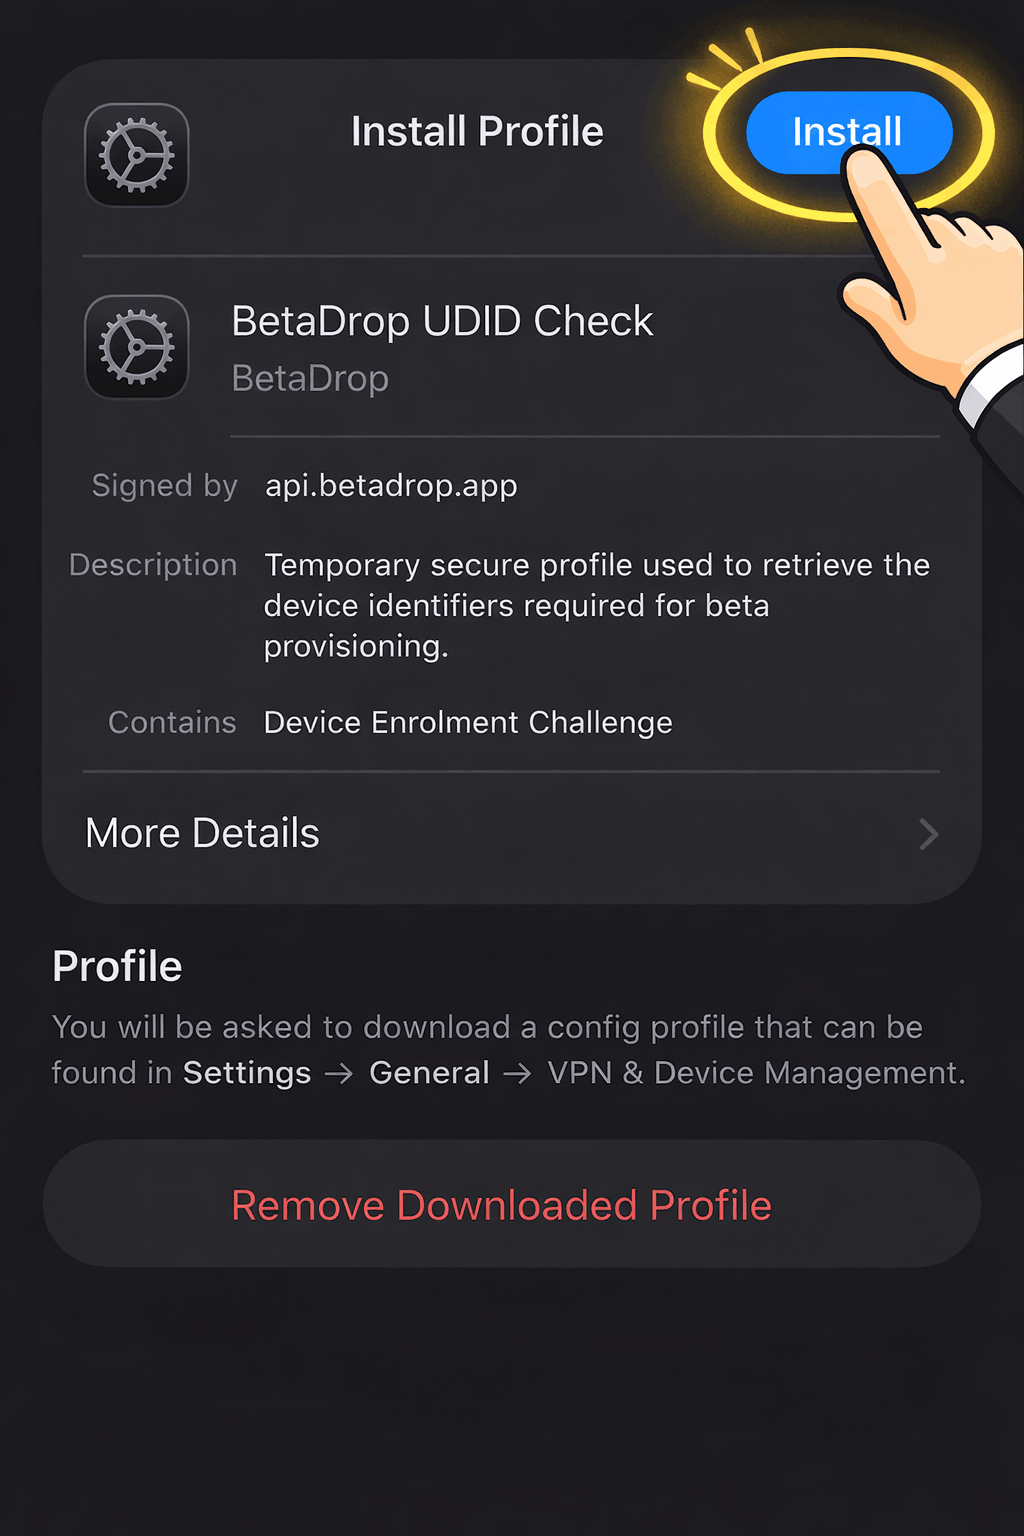
- Tap Download UDID Profile, then tap Install when iOS shows the configuration profile screen.
- The result page prints the UDID next to the model identifier, iOS version and serial number. Copy the UDID exactly, with nothing trimmed.
What is a UDID?
A UDID (Unique Device Identifier) is a fixed string that identifies one physical iPhone, iPad or iPod touch. Older devices report 40 hexadecimal characters. Devices from the iPhone XS generation onward (anything with an A12 chip or newer) report a 25-character value shaped as eight characters, a hyphen, then sixteen more, such as 00008030-000A1B2C3D4E5F60. Both forms are valid. Whichever one your device shows is the one to send, copied exactly, with nothing trimmed or reformatted.
The value belongs to the hardware rather than to the software on it. It survives a factory reset, an iOS upgrade and a change of owner, which is precisely why Apple stopped letting apps read it: the API was removed in 2013 after UDIDs turned into an advertising tracker. Apple still uses it for one job: deciding which devices a signed build is allowed to install on.
That job is why anyone asks you for it. An iOS build is not simply signed; it ships with an embedded provisioning profile that names the signing certificate, the entitlements and (for development and ad-hoc profiles) an explicit list of device UDIDs. At install time iOS compares the device against that list. If it is not there, the install is refused. Apple signs the profile, so the list cannot be edited afterwards: registering a device means regenerating the profile and building again. Reading a UDID from a computer covers the desktop routes and what a tester sees when Stolen Device Protection delays the check.
100 devices of each type, per membership year
An Apple Developer Program membership can register 100 iPhones, 100 iPads, 100 Apple Watches and so on — counted per device type, per membership year. Development and ad-hoc profiles draw from the same list, and a device removed mid-year does not free its slot until the membership renews. Collect the UDIDs you will actually use.
Collecting them from other people? Send testers a link instead of instructions.
How this page reads a UDID without a cable
iOS exposes no UDID anywhere in Settings, so every way of reading one either involves a cable or involves a configuration profile. The tool above takes the second path: Apple's over-the-air profile-service flow, the same mechanism mobile device management uses to enrol a device. The cable routes are below, if the device is already plugged into something.
The button creates a short-lived session and serves a configuration profile whose payload type is Profile Service. iOS shows you the profile-details screen, and only after you tap Install does the device post a signed response back over HTTPS containing the attributes the profile asked for. It is a one-shot query, not an ongoing connection, and it is the mechanism Apple defines for over-the-air device enrolment. The profile requests exactly five fields:
- UDID — the identifier you came for.
- PRODUCT — the model identifier, for example
iPhone15,3, shown on the result page as Product. - VERSION — the iOS version the device is running.
- SERIAL — the hardware serial number.
- IMEI — cellular models only; a Wi-Fi iPad returns nothing here.
A Profile Service payload has no way to reach photos, messages, contacts, location or installed apps. Those are separate payload types this profile does not contain, and iOS would list them on the install screen if it did. Read that screen before you approve it, on this site or any other. Browser help covers the one common failure, which is an in-app browser silently blocking the profile prompt.
What is stored, and for how long
A privacy claim is only worth reading if it is specific, so here is the whole record. Two things are written down: the five attributes iOS returns after you approve the profile, and the ordinary request metadata from the moment you press the button.
- From the device — the five fields listed above: UDID, model identifier, iOS version, serial number, and IMEI on cellular models.
- From the request — the IP address the check was started from and the browser user-agent string, plus three coarse labels derived from that string (browser, platform, device type). The IP is what rate-limits the endpoint (twelve checks per ten minutes from one address); the labels are diagnostic context, kept so a failed check can be explained rather than guessed at.
A check started from this page has no account and no sign-in behind it. It is addressed only by a random one-time token, which travels in the result link; the page also keeps that token in the browser's sessionStorage, along with the one-time profile link it addresses, so an install Apple delayed can be re-run without starting over. The result survives a refresh, and that copy disappears when the tab closes. No name, email or account is attached (the IP address above is kept to rate-limit the endpoint, not to identify you), so the link is the only way back to the result. Keep it if you want it later.
Timing works in two stages. A session stays open for 90 minutes by default, the window in which the device has to come back with its answer. A check that is never completed is marked expired at the end of it. Ninety rather than an hour because iPhone itself can impose a one-hour Security Delay before it will install the profile, and a window shorter than that would close before the device was ever allowed to answer. Completing the check does not extend that clock so much as make it irrelevant: the result stays readable until the record itself is deleted, which a scheduled cleanup does a week after the expiry timestamp. Nothing survives it. Once you have copied the UDID there is no reason to leave the profile installed either; remove it under Settings > General > VPN & Device Management.
One exception: a registration link
Everything above describes the anonymous tool on this page. If you arrived through a registration link a developer sent you (a /collect/ link, usually by email), then the check is deliberately not anonymous, because its whole purpose is to tell that developer which device is yours. In that case:
- The five device attributes are copied to the developer's account, alongside the name and email address they entered when inviting you (or that you entered yourself, on an open link).
- That copy is kept until the developer deletes it. The one-week cleanup above applies to the check, not to their device list. The two are separate records by design.
- The same applies to a device you register yourself while signed in to a BetaDrop account, from the Devices page.
The invite email says who is asking before you tap anything, and iOS lists what the profile requests before you approve it. If you would rather not be identified, use this page instead and send the developer the value yourself.
Every way to check a UDID on an iPhone or iPad
There are four working routes and one dead end. Which one to use comes down to what is within reach: the profile flow above needs only the device, and the other three all need a cable and a computer the tester may not have.
- A configuration profile, from the device itselfNothing but the device
- Open this page in Safari on the iPhone or iPad you want to identify (not inside another app's built-in browser) and tap the download button. iOS shows the profile screen, you tap Install, and the UDID appears on the result page. Safari specifically: Chrome, Firefox and Edge on iOS tend to save the profile as a download instead of handing it to Settings, which looks like nothing happening. It is the only route that does not need a computer, which is why it is the one to send a tester.
- Finder, on macOS Catalina (10.15) and laterA Mac and a cable
- Connect the device, trust the computer at both ends, then select it in the Finder sidebar. In the General tab, click the small line of text under the device name: it cycles through the device's identifiers: serial number, UDID, ECID, and IMEI on cellular models. Keep clicking until the long value appears, then right-click it to copy.
- iTunes, on Windows or macOS Mojave (10.14) and earlierA PC or older Mac, and a cable
- Same trick in a different window. Open the device's Summary tab and click the Serial Number label until it changes to Unique Device Identifier, then use Edit > Copy. This is the route to give a tester who has no Mac but is willing to plug in.
- Xcode's Devices and Simulators windowA Mac with Xcode and a cable
- Window > Devices and Simulators, pick the connected device in the left column, and the Identifier field is its UDID. Worth using when you are already in Xcode, because the same window will register the device with your team rather than making you paste the value into the developer portal by hand.
- Settings on the device—
- Not a route at all, though it is where most people look first. Settings > General > About lists the serial number and, on cellular models, the IMEI. iOS has never shown the UDID anywhere in Settings, on any version.
One route that does not exist is an app. Apple removed the UDID API in iOS 7 back in 2013, so nothing you install from the App Store can read the value. An app promising to display yours is either showing a different identifier or handing you off to a web page that does what this one does. Anything genuinely reading a UDID asks you to install a configuration profile first, on this site or any other, and that install screen is the moment to check what the profile is requesting.
UDID, serial number, IMEI: which one is being asked for
Sending the wrong identifier is the most common reason a device never gets registered. All four values below identify something about the device; only one of them registers it with Apple.
| Identifier | What it is | Where you find it | Registers a device? |
|---|---|---|---|
| UDID | A fixed 40-character hex string, or a 25-character value like 00008030-000A1B2C3D4E5F60 on A12 devices and newer. | Finder or Xcode over a cable, or a configuration profile such as this one. | Yes |
| Serial number | Apple's service and warranty reference for the hardware. | Settings > General > About, or Finder next to the device name. | No |
| IMEI | The 15-digit GSMA number belonging to the cellular modem. Wi-Fi-only iPads have none. | Settings > General > About, or by dialling *#06#. | No |
| identifierForVendor | A per-vendor UUID an app can read at runtime, reset when the last app from that vendor is deleted. | Only from inside an app, in code. | No |
If a screen shows you a value that is neither 40 hex characters nor the eight-hyphen-sixteen form, it is not a UDID, and the Apple Developer portal will not accept it as a device identifier. Checking the shape before you paste saves a round trip with whoever sent it. The full guide to finding a UDID on iPhone or iPad walks through the desktop routes step by step.
Collecting UDIDs from testers without the back-and-forth
Everything above assumes the tester finds their own UDID and then sends it to you, by message or email or screenshot. That hand-off is where device collection actually breaks: values arrive truncated, a serial number arrives instead of a UDID, one tester never replies at all. You usually find out at the point the build refuses to install.
Signed in to a BetaDrop account you can remove that step entirely. From the Devices page you invite a tester by name and email and BetaDrop sends them a registration link. They open it, approve the same profile this page uses, and that is the end of their involvement: they never see a UDID and have nothing to copy. On your side the device appears in your list with its UDID, model identifier and iOS version, and BetaDrop emails you to say it arrived. Nobody has to remember to get back to you.
- Nothing can be mistyped. iOS reports the identifier to the API itself, so the value in your list is the value the device gave — not a retyped one, and never a serial number by mistake.
- You know whose device is whose. The name and email come from the invite you sent rather than from a form the tester fills in, which is what makes the list still readable when you are up against Apple's hundred-device ceiling.
- Or use one open link. For a group you cannot list in advance, a single open collection link covers the whole group, with each tester entering their own name and email before they register.
The tester's experience is the flow described on this page, so nothing above stops being true. An emailed invite is simply the version where they are not asked to handle the identifier. Sign in to send one, or keep using this page if you only need your own device.
What to do once you have the UDID
- Register the device. Apple Developer portal → Certificates, Identifiers and Profiles → Devices → +, paste the UDID exactly as the tester sent it, and give it a name you will recognise a year from now. From CI, fastlane's
register_devicesdoes the same thing. - Regenerate the profile. A profile generated before the device existed does not contain it. Edit the ad-hoc profile, tick the new device, and download the fresh copy — or let
sighormatchregenerate it for you. - Rebuild. Product → Archive → Distribute App → Release Testing (Ad Hoc in Xcode 14 and earlier), using the regenerated profile. Registering a device never retro-fits an
.ipayou exported earlier; the device list is copied into that build's embedded profile at build time. What signing actually involves explains why re-signing is rarely the answer when you can rebuild. - Verify before you send. Drop the
.mobileprovisioninto the provisioning profile decoder to see exactly which devices the profile covers, or run the finished build through the IPA inspector. Ten seconds here beats a round trip with a tester who cannot install. - Distribute it. Upload the signed IPA and BetaDrop generates the over-the-air install link and QR code. The tester installs from Safari. No TestFlight, no App Store review, no tester account.
Why the app will not install without it
iOS checks the embedded profile at install time and, when the check fails, says very little: the download starts and then stops on Unable to Install, with no indication of which rule was broken. An unregistered UDID is the most frequent cause, but it is not the only one, and they all look identical from the tester's side:
- The device UDID is not in the profile's device list.
- The provisioning profile or the signing certificate has expired.
- The build was signed for the App Store rather than ad-hoc, so it carries no device list at all and will only install through TestFlight or the App Store.
- The build's minimum iOS version is higher than the device is running, or it targets a different device family.
The decoder answers all four in one pass: it shows the profile type, the expiry date and every UDID the profile covers, so you can tell a missing device from an expired certificate before anyone reinstalls anything.
UDID questions, answered
What is a UDID, and is it the same as a UUID?
A UDID (Unique Device Identifier) is a fixed string that identifies one physical iPhone, iPad or iPod touch. Older devices report 40 hexadecimal characters. Devices from the iPhone XS generation onward (A12 chip and newer) report a 25-character value shaped as eight characters, a hyphen, then sixteen more, such as 00008030-000A1B2C3D4E5F60. A UUID is a different thing: a generic 36-character identifier Apple uses for values like identifierForVendor and profile payload IDs. A search for "iPhone UUID" nearly always means the UDID, because that is the value Apple's device registration asks for.
How do I find my UDID without a computer?
Install a temporary configuration profile from the device itself, which is what this page does. iOS shows the serial number and IMEI under Settings > General > About but never the UDID, and no app is permitted to read it, so there is no screen to look at. Open this page in Safari or Chrome on the iPhone or iPad you want to register (not inside another app's built-in browser), tap the download button, approve the profile, and the UDID appears on the result page. The only other route needs hardware: Finder on macOS or iTunes on Windows, with the device plugged in.
Is it safe to share my UDID?
A UDID is an identifier, not a credential. It cannot unlock a device, read its data, or install anything by itself. What a developer can do with it is register your device in their Apple Developer account so their test build is allowed to run on it, and you still have to approve that install yourself. Two things are worth watching. A UDID never changes, so it works as a permanent device fingerprint. And any website that reads one does so by asking you to install a configuration profile, so read the profile screen before tapping Install and remove the profile afterwards from Settings > General > VPN & Device Management. BetaDrop's profile requests five fields (UDID, model identifier, iOS version, serial number and IMEI) and nothing else.
Is a UDID the same as the IMEI or the serial number?
No, they are three separate identifiers. The serial number is Apple's service and warranty reference. The IMEI is the 15-digit GSMA number belonging to the cellular modem, which is why Wi-Fi-only iPads do not have one. The UDID is the value Apple's provisioning system uses to decide which devices a signed build may install on. Sending a serial number instead of a UDID is the most common mistake in device collection, and the Apple Developer portal will not accept it as a device identifier.
A tester sent me their UDID. What do I do with it?
Register the device in the Apple Developer portal under Certificates, Identifiers and Profiles, add it to your ad-hoc provisioning profile, regenerate that profile, then rebuild the app with it. An .ipa you exported earlier will not pick the device up, because the device list is copied into the provisioning profile embedded in that build at build time. Confirm the UDID is present with the provisioning profile decoder before you send anything, then upload the new .ipa to BetaDrop and share the install link.
Do my testers have to send me their UDID by hand?
Only if you collect them anonymously from this page. Signed in to a BetaDrop account you invite a tester by name and email from the Devices page, and BetaDrop sends them a registration link. The tester opens it and approves the same configuration profile described here; they are never shown a UDID and have nothing to copy or paste. The device arrives in your device list with its UDID, model identifier and iOS version, and BetaDrop emails you when it does. There is also an open link for groups you cannot list in advance, where each tester enters their own name and email before registering.
Why does the app fail to install if the device is not registered?
Because iOS compares the device's UDID against the list inside the build's embedded provisioning profile before it will install anything. If the UDID is absent, the install stops with an unhelpful "Unable to Install" message rather than an explanation. Registering the device in the Apple portal afterwards does not repair the copy already on the tester's phone: Apple signs the profile, so its device list cannot be edited after the fact, and only a rebuild carries the updated list.
How many UDIDs can one Apple Developer account register?
One hundred of each device type per membership year, so 100 iPhones, 100 iPads, 100 Apple Watches, and so on. Development and ad-hoc profiles draw from the same list, and removing a device mid-year does not free its slot until the membership renews, so it is worth registering only devices you genuinely test on. Teams that outgrow the limit usually move to TestFlight, which reaches many more testers but sends builds for external testers through Apple's beta review first.
How do I check and verify my iPhone or iPad's UDID?
Open this page in Safari on the device itself and tap to install a temporary profile; the UDID and the other identifiers come straight back on the result screen with a copy button. It takes a few taps, needs no app and no computer, and the profile can be removed in Settings straight afterwards. A UDID belongs to one specific device, so it has to be read on the iPhone or iPad you are registering.
Do I need to install an app to get my UDID?
No. There is no app and no App Store download. The page uses a temporary Apple configuration profile that reports the device identifiers back to the result screen, and you can delete that profile in Settings once you have copied the UDID. Nothing is left running on the device.
